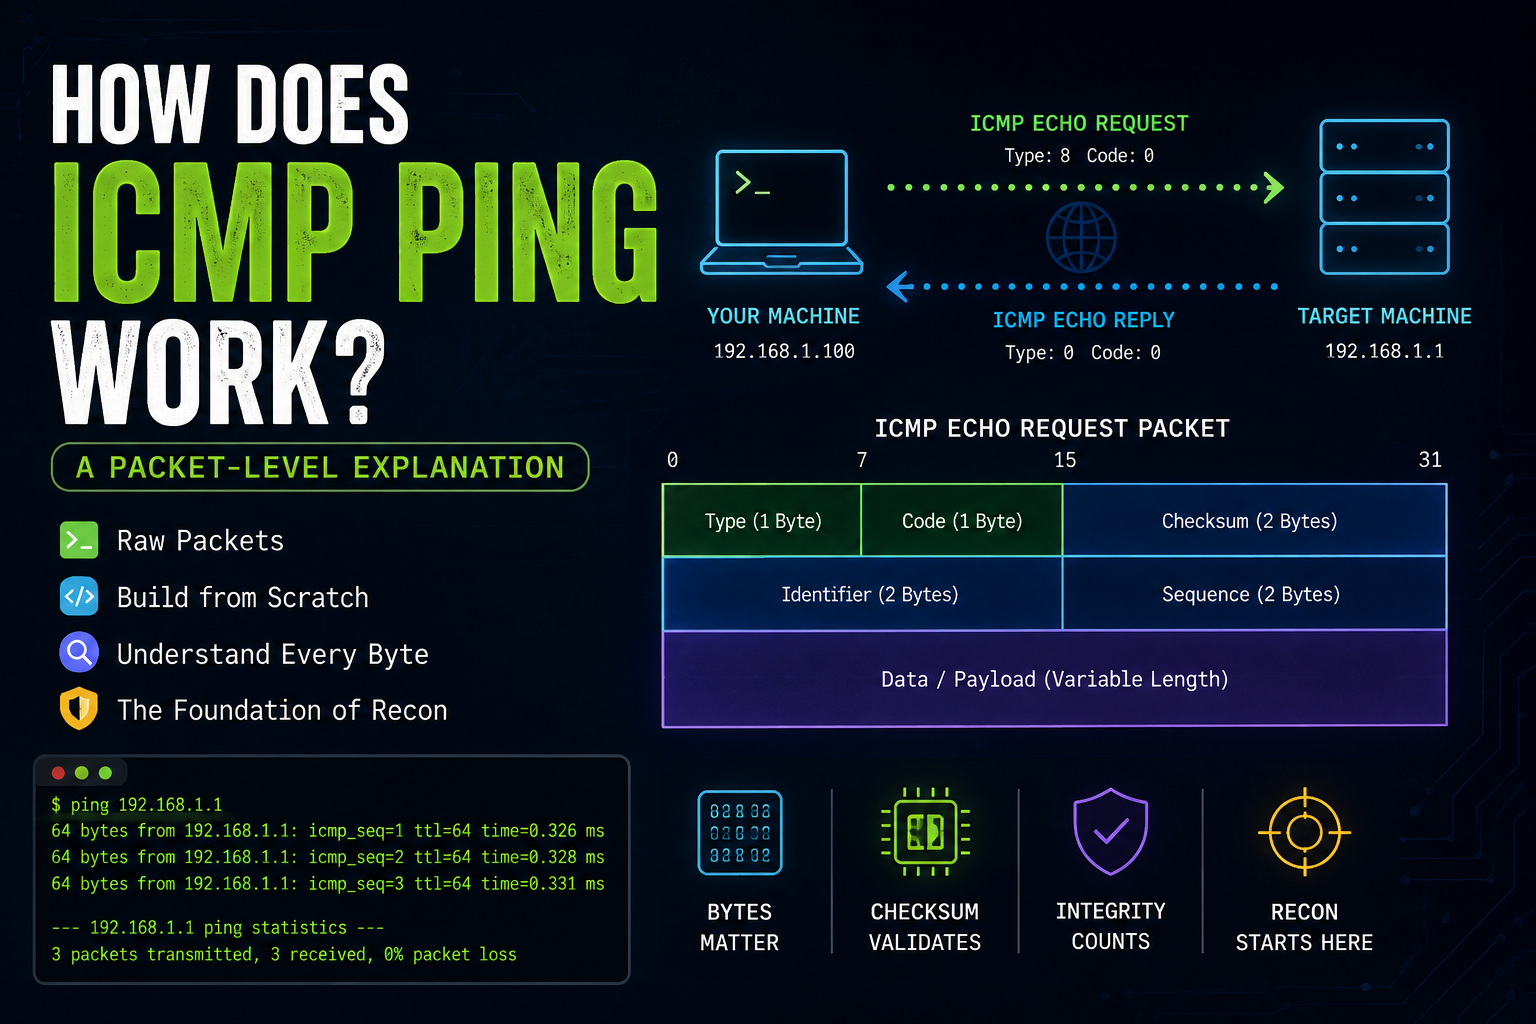
How Does ICMP Ping Work? A Packet-Level Explanation
Have you ever wondered how a system determines whether a target is reachable?
Usually, we use the ping command to test whether a target responds to an ICMP Echo Request.
But what actually happens underneath?
In this article, we're going to understand the process at the packet level and build an ICMP Echo Request from scratch using Go.
No ping package.
No high-level networking library.
Just bytes, packets, and the network.
Required Input
For this example, we only need one thing:
- Target IPv4 address
That's it.
For example:
192.168.29.62
Our goal is to construct an ICMP Echo Request packet and eventually send it to that target.
The Workflow
When you're building a network-related application, one of the most important things to understand is:
Everything eventually becomes bytes that are transmitted as packets.
So before we communicate with the target, we need to construct the packet we want to send.
Understanding ICMP
ICMP stands for Internet Control Message Protocol.
The ping utility commonly uses ICMP Echo Request and Echo Reply messages.
For an ICMP Echo Request/Reply, the ICMP header is 8 bytes.
Byte 0       → Type          (8 bits / 1 byte)
Byte 1       → Code          (8 bits / 1 byte)
Byte 2-3     → Checksum      (16 bits / 2 bytes)
Byte 4-5     → Identifier    (16 bits / 2 bytes)
Byte 6-7     → Sequence      (16 bits / 2 bytes)
So:
1 + 1 + 2 + 2 + 2 = 8 bytes
That's our basic ICMP Echo header.
But the ICMP message doesn't necessarily end after those 8 bytes.
We can attach additional data after the header.
For our example, we'll attach a message.
So our packet will look like:
┌──────────────────────────┐
│      ICMP Header         │  8 bytes
├──────────────────────────┤
│      Message / Data      │  len(message)
└──────────────────────────┘
Let's Construct Our Request Packet
Now that we understand the ICMP header, let's construct an Echo Request.
func BuildPacket(i UserInputs) []byte {
    packet := make([]byte, 8+len(i.Message))

    packet[0] = 8 // Echo Request
    packet[1] = 0 // Code

    binary.BigEndian.PutUint16(packet[4:6], 51) // Identifier
    binary.BigEndian.PutUint16(packet[6:8], 61) // Sequence

    copy(packet[8:], []byte(i.Message))

    binary.BigEndian.PutUint16(packet[2:4], checksum(packet))

    return packet
}
There are a few important things happening here.
Allocating the packet
packet := make([]byte, 8+len(i.Message))
We know the ICMP header requires 8 bytes.
Then we add enough space for our message.
For example, if:
len(message) = 5
then:
8 + 5 = 13 bytes
So our packet will contain:
8 bytes  → ICMP header
5 bytes  → Message
-------------------
13 bytes → Total
Writing the Message
This line:
copy(packet[8:], []byte(i.Message))
means:
Start writing the message at byte 8.
Why byte 8?
Because bytes 0-7 are already occupied by the ICMP header.
0       → Type
1       → Code
2-3     → Checksum
4-5     → Identifier
6-7     → Sequence

8...    → Message / Data
That's why we allocate:
8 + len(i.Message)
instead of simply:
len(i.Message)
Checksum — The Core Part
Now we reach one of the most important parts of the ICMP packet:
the checksum.
Our checksum function is:
func checksum(data []byte) uint16 {
    var sum uint32

    // Process 16-bit words
    for i := 0; i+1 < len(data); i += 2 {
        word := uint16(data[i])<<8 | uint16(data[i+1])
        sum += uint32(word)
    }

    // Handle odd byte
    if len(data)%2 != 0 {
        sum += uint32(data[len(data)-1]) << 8
    }

    // End-around carry
    for (sum >> 16) != 0 {
        sum = (sum & 0xFFFF) + (sum >> 16)
    }

    return ^uint16(sum)
}
Let's break it down.
Step 1 — Pair the Bytes
ICMP uses a 16-bit one's-complement checksum.
That means we process the packet as 16-bit words.
So we take two bytes at a time.
For example, suppose the packet contains:
34 34 35 43 34 43
We group them like this:
34 34  →  0x3434
35 43  →  0x3543
34 43  →  0x3443
In Go:
word := uint16(data[i])<<8 | uint16(data[i+1])
We're combining two 8-bit bytes into one 16-bit value.
What If the Packet Has an Odd Number of Bytes?
What happens if the packet contains an odd number of bytes?
For the checksum calculation, the final byte is treated as the high byte of a 16-bit word, with the low byte considered zero.
For example:
0x34
becomes:
0x3400
That's what this does:
data[len(data)-1] << 8
So:
34
becomes:
34 00
before being added to the checksum sum.
Why Is sum a uint32?
You might notice something interesting.
The checksum is ultimately:
uint16
So why do we use:
var sum uint32
during the calculation?
Because adding two 16-bit values can produce a result larger than 16 bits.
For example:
0xFFFF
+0x0001
-------
0x10000
0x10000 requires 17 bits.
So we use uint32 to safely hold the intermediate result.
Later, we fold the result back into 16 bits.
Step 2 — End-Around Carry
This is where one's-complement addition becomes important.
Consider:
sum = 0x10002
The lower 16 bits are:
0x0002
The carry is:
0x0001
Instead of throwing the carry away, we add it back:
  0x0002
+ 0x0001
---------
  0x0003
This is called an end-around carry.
Our code performs this operation:
for (sum >> 16) != 0 {
    sum = (sum & 0xFFFF) + (sum >> 16)
}
Here:
sum & 0xFFFF
gets the lower 16 bits.
And:
sum >> 16
gets the carry.
We continue until there is no carry left.
Step 3 — One's Complement
Finally:
return ^uint16(sum)
The ^ operator performs a bitwise NOT.
So every bit is inverted.
For example:
Sum:
0001 0010 0011 0100

One's complement:
1110 1101 1100 1011
In hexadecimal:
Sum       = 0x1234
Checksum  = 0xEDCB
Because they are one's complements of each other:
0x1234
0xEDCB
their bitwise OR is:
0xFFFF
0x1234
   OR
0xEDCB
------
0xFFFF
Important: this OR relationship is useful for understanding that the checksum is the one's complement of the sum. It is not itself the checksum validation algorithm.
During actual validation, the receiver performs the one's-complement checksum calculation over the received message, including the checksum field. A correctly formed message produces the expected all-ones result under that arithmetic.
Why Do We Use a Checksum?
The checksum allows the receiver to detect corruption in the ICMP message during transmission.
The sender:
Data
  ↓
One's-complement sum
  ↓
One's complement
  ↓
Checksum
The checksum is placed into the ICMP header before the packet is sent.
The receiver can then perform the checksum calculation on the received ICMP message to verify its integrity.
It is important to remember that a checksum is an error-detection mechanism, not a cryptographic integrity or authentication mechanism.
Echo Request
At this point, we've constructed our ICMP Echo Request.
Our packet contains:
┌──────────────────────────┐
│ Type                     │
│ Code                     │
│ Checksum                 │
│ Identifier               │
│ Sequence                 │
├──────────────────────────┤
│ Message / Data           │
└──────────────────────────┘
The resulting byte slice contains:
ICMP Header + Message
For example:
[8, 0, ..., ..., ..., ..., ..., ..., ...]
where:
8 → ICMP Echo Request
0 → ICMP Code
The checksum is calculated after the rest of the packet has been constructed.
But We Haven't Sent Anything Yet...
So far, we've only created the ICMP message as bytes.
We haven't actually communicated with the target.
That's the next layer of the problem.
We need a socket interface that allows our application to communicate with the networking stack.
In the next part, we'll move from:
Application
     ↓
Build ICMP bytes
to:
Application
     ↓
Socket
     ↓
Kernel networking stack
     ↓
Network
     ↓
Target
And we'll see what actually happens when we send that Echo Request.
Part 2 — From Bytes to the Network
We've built the ICMP packet.
But a packet sitting inside a []byte isn't going anywhere.
How do those bytes actually reach the network?
In Part 2, we'll open the socket, communicate with the kernel's networking stack, send our ICMP Echo Request, and inspect the Echo Reply coming back from the target.
That's where things get interesting.
Stay tuned. 🚀